


When I thought about planning a shark party, I was a little apprehensive since there wasn't really a lot of shark party ideas out on the Internet, nor in the party supply stores. This blog posting is about how I gathered ideas to throw a shark party and some tutorials on a few of the elements of the party.
Last year, I started planning my son's rocket-themed 3rd birthday party in September; this year, I didn't start the planning of his 4th birthday party until about 3 weeks beforehand because I was trying to decide on a theme. I was waffling between a pirate party, a dinosaur party or a shark party. After days of indecision, I finally decided to do the shark party; first, because he plain LOVES sharks; second, because there isn't a lot of "shark stuff" in the party supplies stores, which would give me a lot of lee-way to be creative and might even give me some creations to add to my Etsy shop; and third, because a shark party should be on the fairly easy side, which was a bonus because I only had a couple of weeks to plan.

I scoured the internet for hours researching ideas for a shark party, and when I came across ideas that I liked, I pinned them to my "Shark Party Ideas" Pinterest board. If you haven't heard of Pinterest, it's just one of the best ideas on the internet! It's basically a virtual cork board, where you "pin" ideas/photos that you find on the internet onto your individual "boards". Before Pinterest, I used to email the links to myself, of the ideas that I found on the internet and then make separate email folders for each idea type. It worked, but you couldn't look at all of your ideas in one place. These Pinterest boards are so nice, because you can actually see all of the photos of all of your ideas in one spot, instead of grouped up as a lot of links in an email folder, like I used to do. Brilliant!
The Shark Invitations:
First on my agenda were the invitations. I wanted to design and make my own paper invites. But then I found this idea online and thought how cute it would be if I could get him to pose with all of his shark toys and maybe even get him to wear some goggles.
 |
| SOURCE |
But in order to do this, I would have to set up and take the actual photo, get it developed, pick them up, address them, stamp them and then send them off in the mail. That would have taken a lot of work and I didn't have a lot of time. (You will see that this is a recurring theme throughout this party planning.) So I decided to send an online invitation, via Pingg, instead. Here it is:

I found an old photo of my son sitting on a fake shark, from when we went to the shark exhibit at the "Aquarium of the Pacific" last year. I uploaded it into Picasa and edited it by adding the white shark silhouettes and the "You're Invited!" lettering in "scary" shark font, which were available in Picasa (UPDATE: Picasa no longer exists, please use www.PicMonkey.com instead.) Then, I uploaded the finalized photo into "Pingg", and then updated the party info. Pingg is similar to Evite, but has different features, such as your own webpage for your invitation, plus there are ways to link to social media, like Facebook, etc.
I was really happy with how the invitations turned out, so I hit "send" and set about planning the party!
Party Layout:
Our house is small and to have a ton of guests in our house takes a bit of planning. For last year's party, I'd set up different "stations" around the house because I knew our guests had to be spread out, simply because we didn't have enough chairs in one area. I used the entire ground floor of our house, including the front patio and the attached garage. In the dining room, I covered the table with paper and made it a coloring station, complete with crayons and markers, and had printed out shark-themed coloring pages. I Googled "shark-themed coloring pages" and tried to pick out the most friendly-looking shark coloring pages. I didn't want to scare any of the kids! I also had an ocean scene foam activity kit set out for the kids to use.

The living room wall was papered with this great ocean scene that I picked up at Joann's Fabrics, in the "teacher department". I got a discount on it because one of the corners was torn. I always ask for a discount of there is any damage to an item I'm buying. The worst they can say is "No", and you'll be helping them by taking damaged product off of their hands, so they'll most likely say "Yes". Here's what it looked like, but it was on a 15 foot roll of paper, which we papered the living room wall with:
 |
| SOURCE |
I had the "Feed the Shark" game and we set up the old playhouse/slide set in the garage, and I set up chairs around each station, so the parents could hang out and chat, while their kids played.

I had a bucket of helmets, knee and elbow pads and orange cones set out near the garage door opening and had bikes, scooters, skateboards and roller skates set out for the kids to play with, in the alley. I recruited some of the parents to bring extra bikes, helmets, etc, to ensure we had enough.


Shark Decorations:
I love pennant banners, but I didn't think they would look good as decoration for a shark party, so I racked my brain and thought I could make a triangular-shaped pennant banner that looked like sharks:

 |
While scouring the internet for shark party ideas, I came across these other really cute ideas:
"Beware of Sharks" Signs:


 |

I am now selling these signs in my Etsy shop, in a digital file version: HERE
Wearable Shark Fins:
This was one of the ideas that I came across while researching shark parties on the internet when I couldn't decide on the theme. These shark fins really cemented the party them idea. I thought they were SO CUTE!
 |
I tried my hand and here's the version I came up with:

|


Some of the adults wore them, too!


Shark Party Hats:
Shark party hats!! How brilliant! I really love this idea! This is the original photo I saw while searching for ideas online. Plus, bonus: the blog posting came with a tutorial! (Click on the word "source" below this photo for the tutorial):
 |
| SOURCE |

The kids LOVED them and scrambled to put them on when we gathered around for the cake:

What's a party without a shark cut-out?
 |
| SOURCE |
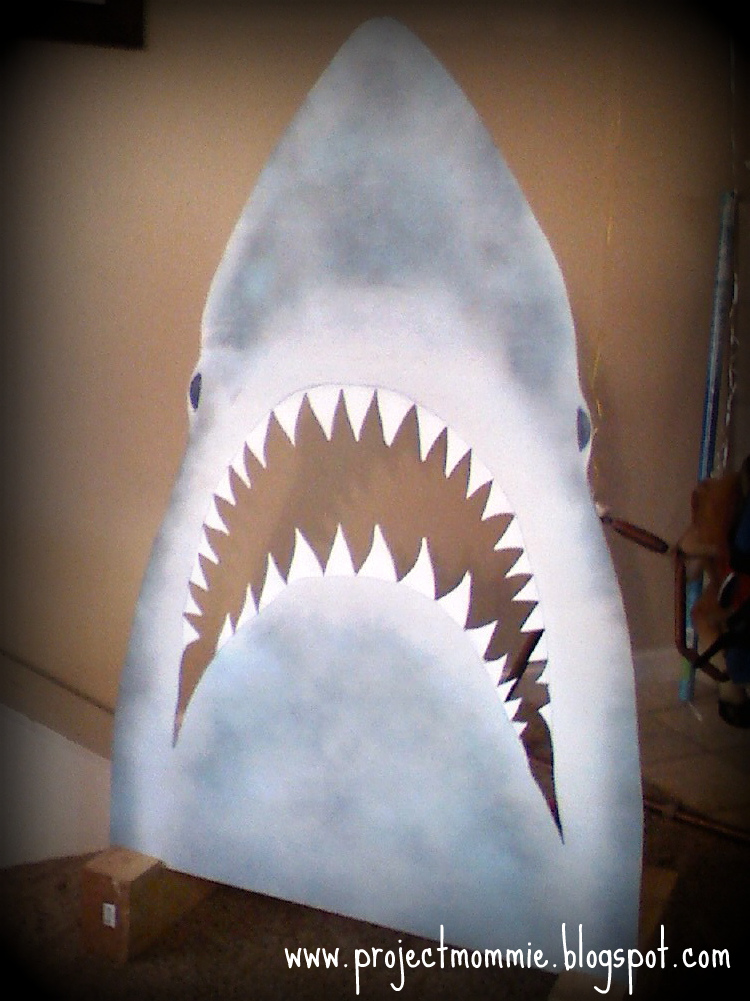 |
| The shark prop that my amazing neighbor made. |
The only issue was that it was the night before the party and I had NO RED CLOTH!!! I frantically searched my tablecloth supply. No red tablecloth. I checked my towels. Nope. I even checked my clothes. Nothing suitable. Then I'd remembered that I'd dressed up as a "podium girl" a couple of years ago for Halloween. This particular "podium girl" was the Tour de France "King of the Mountains" podium girl, who wears a white dress with red polka dots:

I'd taken a white tank top and a white skirt, then attached red cloth circles to the entire outfit.
 |
| Pre-cut circles, from red terry cloth |
 |
| Supplies: red cloth circles, glue gun, measuring cup, "beans", funnel |
 |
| Sandwich two circles together, then apply glue most of the way around one of the circles, leaving about an inch for the opening. |
 |
| Using the funnel add the "beans", filling about 3/4 full. |
 |
| Hot glue the circle closed |
 |
| Voila! |
I created a "Feed the Shark" game sign; again using royalty free shark clipart and font from Picasa, printed it on a piece of 8x10 card stock and taped it to an old paint bucket and the game was ready to go! Or you can download a copy HERE.
 |
| Game |
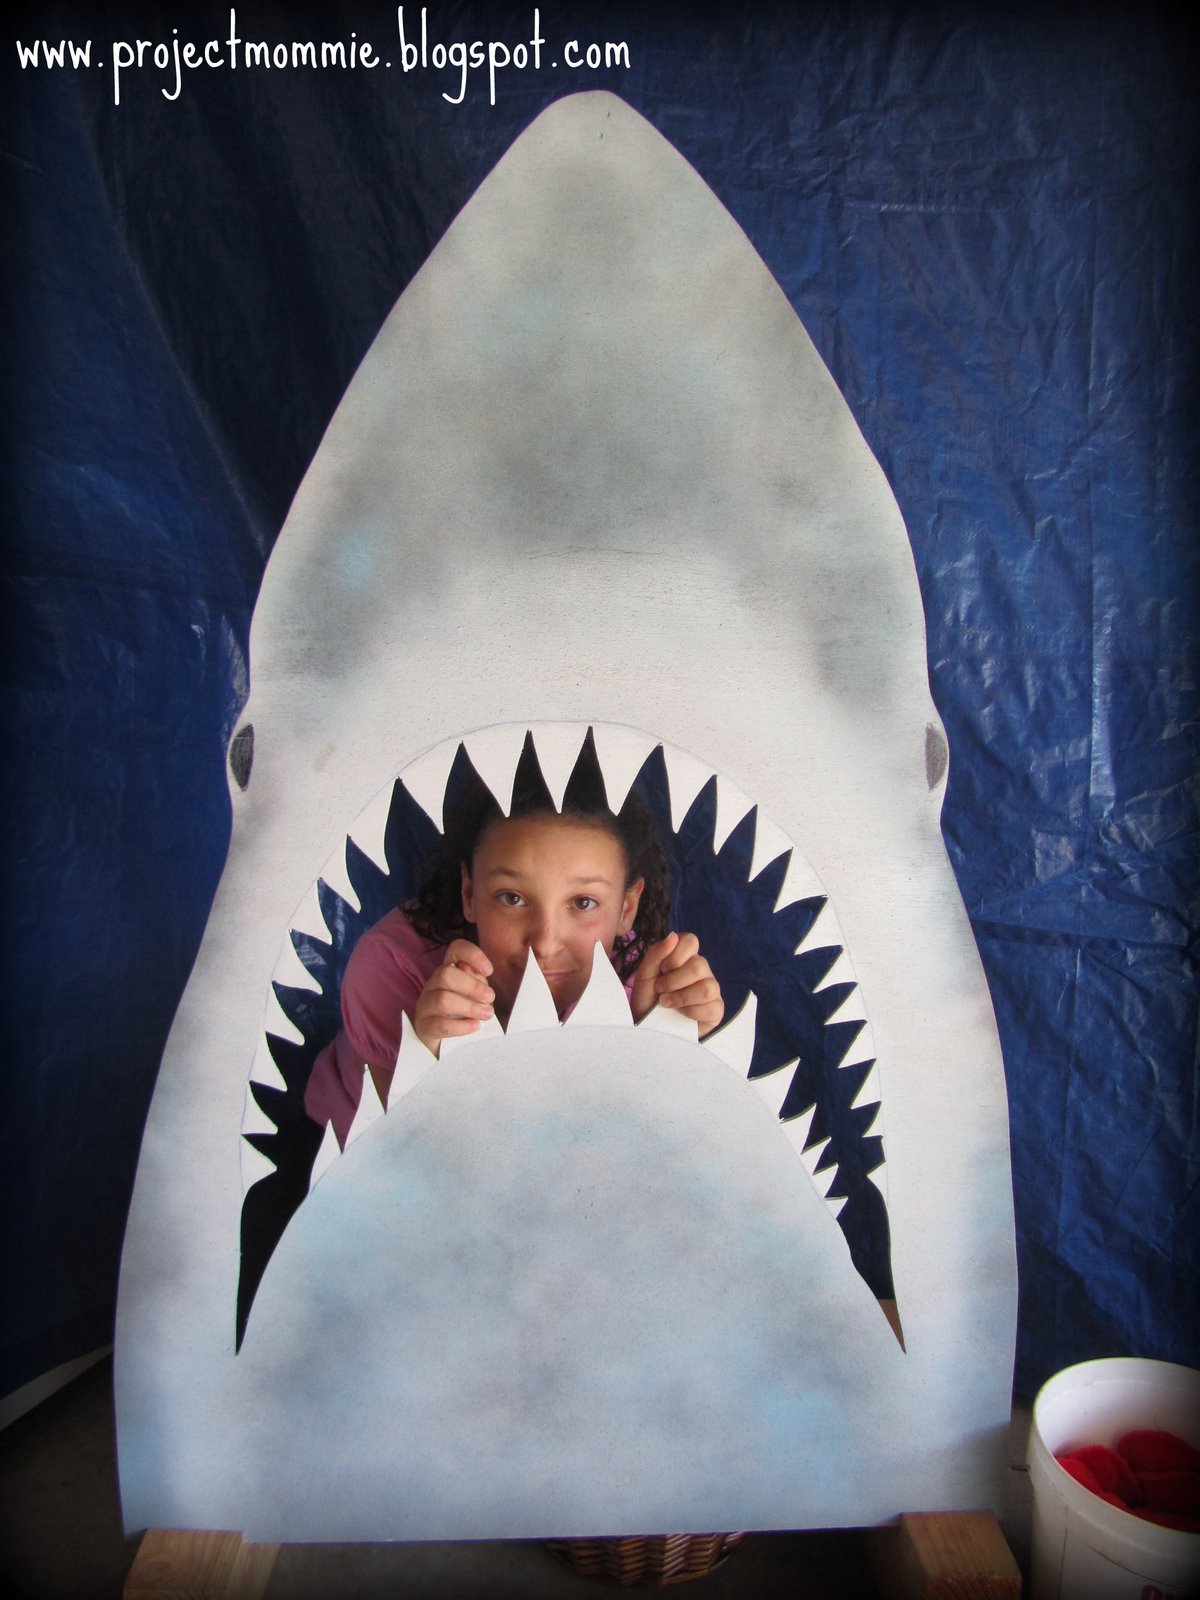 |
| Photo opportunity |
 |
| Decoration |
I didn't get a photo of the food table, but one of the items I served was tuna fish sandwiches cut into triangles, to resemble shark fins.
My mother-in-law taught me how to make the best tuna salad recipe ever:
1 can of tuna in water, water drained
1 cup of mayo
1 Tablespoon lemon juice
1 teaspoon of celery salt
1 teaspoon of black pepper
2 Tablespoons of dill, or to taste (don't be afraid to add more, add lots of dill - it's the key!)
Mix well in bowl.
Food Tent Labels:
I also created these shark party food tents and set them up on the food table! I printed them out on yellow cardstock to go with the "Caution sign" design element, and they match the "shark party favor tags" that I used with the party favors (see end of this blog posting.)

Cut out, fold in half and write the food item under the word "Caution:" in the caution sign.
You can now purchase the digital file of the food tents in my Etsy shop: HERE
We also had a shark watermelon! Read on...
The Shark Watermelon:
Then I also wanted to make a shark watermelon, but yet again I was running out of time, so I recruited my neighbor again to carve it for us. It came out fabulously and the birthday boy loved it:
 |
| Eef, and another one of his masterpieces. |


Drink:
I wanted to make "chum lemonade" for the party. It's delicious and simple to make. Here's the recipe:
* cans of frozen lemonade concentrate
* water
* small BOX of frozen WHOLE strawberries - 1 box per gallon of drink is plenty
Make the lemonade as directed, and place into a clear drink dispenser. Then add the box of whole strawberries. Mix just a little.

 |
| Recipe Card - Free Download: HERE |
Download and print the recipe card above for the "Shark Chum Lemonade": HERE
You can see how red the lemonade got. That was purely from the strawberries; no food dye necessary. It's DELICIOUS and it looks like there is real bloody chum floating in the lemonade!
The Cake:
Ah, yes. The cake. This past summer I really, REALLY got into baking cakes. I spent hours and hours, week after week, month after month, for the entire summer, baking cake after cake after cake. You get the picture. After I made my last cake of the summer, The Western Cakes, I knew that would be the "piece de resistance" of all the cakes I'd made, and that was it. I was officially burnt out. And as much as I wanted to do an incredible, sculptural, spectacular cake for this birthday party, I just couldn't. I was tired. Very. Very. Tired.
So I searched online. There were a lot of shark cakes that I really liked:
 |
| SOURCE |
 |
| SOURCE |
 |
| SOURCE |
 |
| SOURCE |
I didn't feel like I had the skill level or, frankly, the energy to make one. Then I came across this terrific candy-coated cake, with a little tiny shark on it:
 |
| SOURCE |
It was perfect! My son just LOVES candy. What 4-year-old doesn't? I ended up making this "aquarium" cake and cupcakes; complete with gummy sharks! Here's my version:

Before each child went home, they got to fish their own party favor out of a bucket with a Huck Finn type fishing pole, that (again) my neighbor put together. (Yes, he saved the day yet one more time!)

The party favors were shark squirt guns, soft shark bath squirters and a couple of shark loofahs. I made the shark party favor tags to match the signs and tied them on with some gray and silver string. I put a zip-tie loop on each favor, so that the kids could hook the fishing hook into the loop and pull it out of the bucket:

 |
| The digital file for these party favor tags are now for sale in my Etsy shop. |

~~~~~~~~~~~~~~~~~~~~~~~~~~~~~~~
Here are some more shark party ideas that I wanted to do, but just didn't have... you guessed it, time.
All in all, it was a successful party and I think all of the kids had fun. I'm sort of glad I ran out of time on all these things, because it forced me to make things simpler, easier and to delegate and recruit help. Thank you to everyone who helped me to make this party so spectacular!
FREE Shark Links and Downloads:
Here's a summary of all of the FREE Shark links and downloads listed in this blog posting:


Shark-Themed Coloring Pages: HERE
"CHUM: Feed the Shark" sign - For Feed the Shark game: HERE
20 Shark Coloring Pages - Hammerhead, Basking, Great White, Mako, Lemon, Thresher, Tiger, Whale, Nurse, Frilled, Carpetshark, Pacific Angel, Prickly, Whitetip Reed, Blind, Sixgill, Sevengill, California Horn, Common Sawshark, Megalodon: HERE
20 Shark Coloring Pages - Hammerhead, Basking, Great White, Mako, Lemon, Thresher, Tiger, Whale, Nurse, Frilled, Carpetshark, Pacific Angel, Prickly, Whitetip Reed, Blind, Sixgill, Sevengill, California Horn, Common Sawshark, Megalodon: HERE
Shark Party Hat Tutorial: HERE
Shark Chum Lemonade Recipe: HERE
Here is my Shark party Pinterest page: HERE. You'll see several more ideas that I wanted to do for this party, that I thought were so great, but I didn't have time to complete.
Here's the link to the Shark Fin Tutorial and is for sale in my Etsy shop: HERE
I'd love to see your comments and links to your own blog postings about your own shark parties! Thank you for reading my Shark Party posting!

20 comments:
What a great party theme! I especially love the shark fins and hats :)
where are you? Oh how I'd love to use that cut-out for my son's shark party in a couple of weeks!! adrianne at gmail dot com if you're in Arizona!!!
Ah, Adrianne! I wish you lived closer, or I would have let you borrow it!!
What is your shark cutout made out of? Was it cardboard or wood?? Love the idea. :)
Hi Sarah!
It's wood. A thin sheet of plywood. Just make sure it's not too thin, or it might bend and break at the sides of the mouth. I'd love to see a picture of it, if you do end up making one! =)
what did you use to make the pin on fins?
I used felt! I sell the "How to Make A Shark Fin" tutorial in my Esty shop if you are interested! Here's the link:
http://www.etsy.com/shop/luminousmoon
Thanks for asking! :)
thank you :)
Wonder if your close to me. Having a shark party on Feb 16th for my 7 year old. You have such great ideas. You could be hired for parties. Email me please want to see if your close. Cmfish10@yahoo.com
Wow, shark party theme sounds really interesting and unique.. i relly liked the decorations that you have done..especially i liked that watermelon art..simply superb..It will be real fun to plan party like this..thanks for awesome idea..
H! Can you tell me where you found the squirt guns?
Thanks-Kristin
Thanks Jasmine!
Hi Kristin! I found the squirt guns at Cost Plus World Market and at US Toys (which is a party supply store).
Here is the link for US Toys:
http://www.ustoy.com/sea-animal-water-guns
Good luck!
Wow!!! Big thanks from Sweden! You helped me alot :-) My son wants a sharkparty and now I can give him a great one! :-) :-)
Wonderful ideas! Thank you, our party is a last minute throw together and with your ideas it is going to be great! Thanks for putting this together.
Thank you for the ideas. I've been searching online and in stores for shark stuff and NOTHING, lol.
Can you tell me more about your shark game/photo prop your neighbor made? I can see the base is made of wood. Is the shark itself wood? My husband is planning on making a mermaid one for my daughter's party, but I'm not sure where to start.
Thanks so much. Looks like a great party!
Michelle
michelleharrismichelleharris@hotmail.com
Hi Michelle!
Yes, the shark game/photo prop is made out of a sheet of plywood. It looks like he sketched out the shape and the details, like the eyes and teeth, and then cut it out with some sort of power tool. And then I believe he said that he used spray paint to color and shade it. I hope that helps! I love mermaids! Have fun!!!
I found your blog on Pinterest when looking for shark party ideas and am so glad I did! I'm planning my son's first bday right now:) Everything you did was so cute! I live in Long Beach and noticed from your Etsy shop you lived nearby and was wondering if you would be willing to rent the shark cut out if you still have it. I can totally pick it up and return it if you'd be interested in renting it:) I just love it!
Should have left me email:)
ambermolle@gmail.com
woW! This shark theme is definitely a great idea, however I think it is very hard to prepare.
Post a Comment