Monday, October 31, 2011

Pumpkin Seed Heaven

One of the reasons I really, REALLY love pumpkins is for their seeds. I've been known to buy pumpkins, cut them open and roast many batches of seeds at a time. It feels sort of wrong just cutting these beautiful gourds open and tossing them, uncarved, in the trash, but COME ON! It's pumpkin seed time!

Over the years I've perfected the recipe, since I've made them over and over, and one year I submitted it for publication in a cookbook. And guess what? It got published! The greatest part is that it was for a "healthy eating" cookbook put out by DASH, which is a program run by the Boston Medical Center, called "Cooking with DASH", whose primary goal is to help people eat better, lose weight and lower blood pressure. I actually participated in that diet and lost 50 lbs at the time. What a difference 50 lbs makes!

Here's my recipe, called "Pumpkin Seed Heaven". I hope you try it. Enjoy!


What Sound Does A Skeleton Make?

That's what someone asked my son the other day, when they found out that he was going to be a skeleton for Halloween. The baffled look on his face was priceless. Does it go, "Whhhhooooooo-oooooo!!"? Nope, that's a ghost sound. A skeleton is a bag of bones basically, so he concluded that it must make a rattlesnake noise! Thus, an idea was born. Every skeleton needs a bone rattle, right? Here's how I did it:

I purchased a hollow plastic bone. I looked in the costume section of a party supply store, where the caveman costumes were. They were out of the "jumbo bones" ($5) so I headed off to the thrift store and actually found one for $2! And it was two bones connected. Even better!

Since my son's skeleton costume has green bones, I purchased some acrylic paint from the craft supply store in the same shade of green.


I was going to put some dried beans in the bone, but didn't have any so I used popcorn kernels and put my kid to work.


Then I applied two layers of the green paint and two layers of the glow in the dark paint.


And voila! A seriously noisy bone rattler!


Friday, October 28, 2011

Black Cat O'Lanterns Tutorial

Finally. A tutorial!

Halloween is one of my favorite times of the year.  Mostly because I can get really creative making costumes, decorating the house and carving pumpkins.

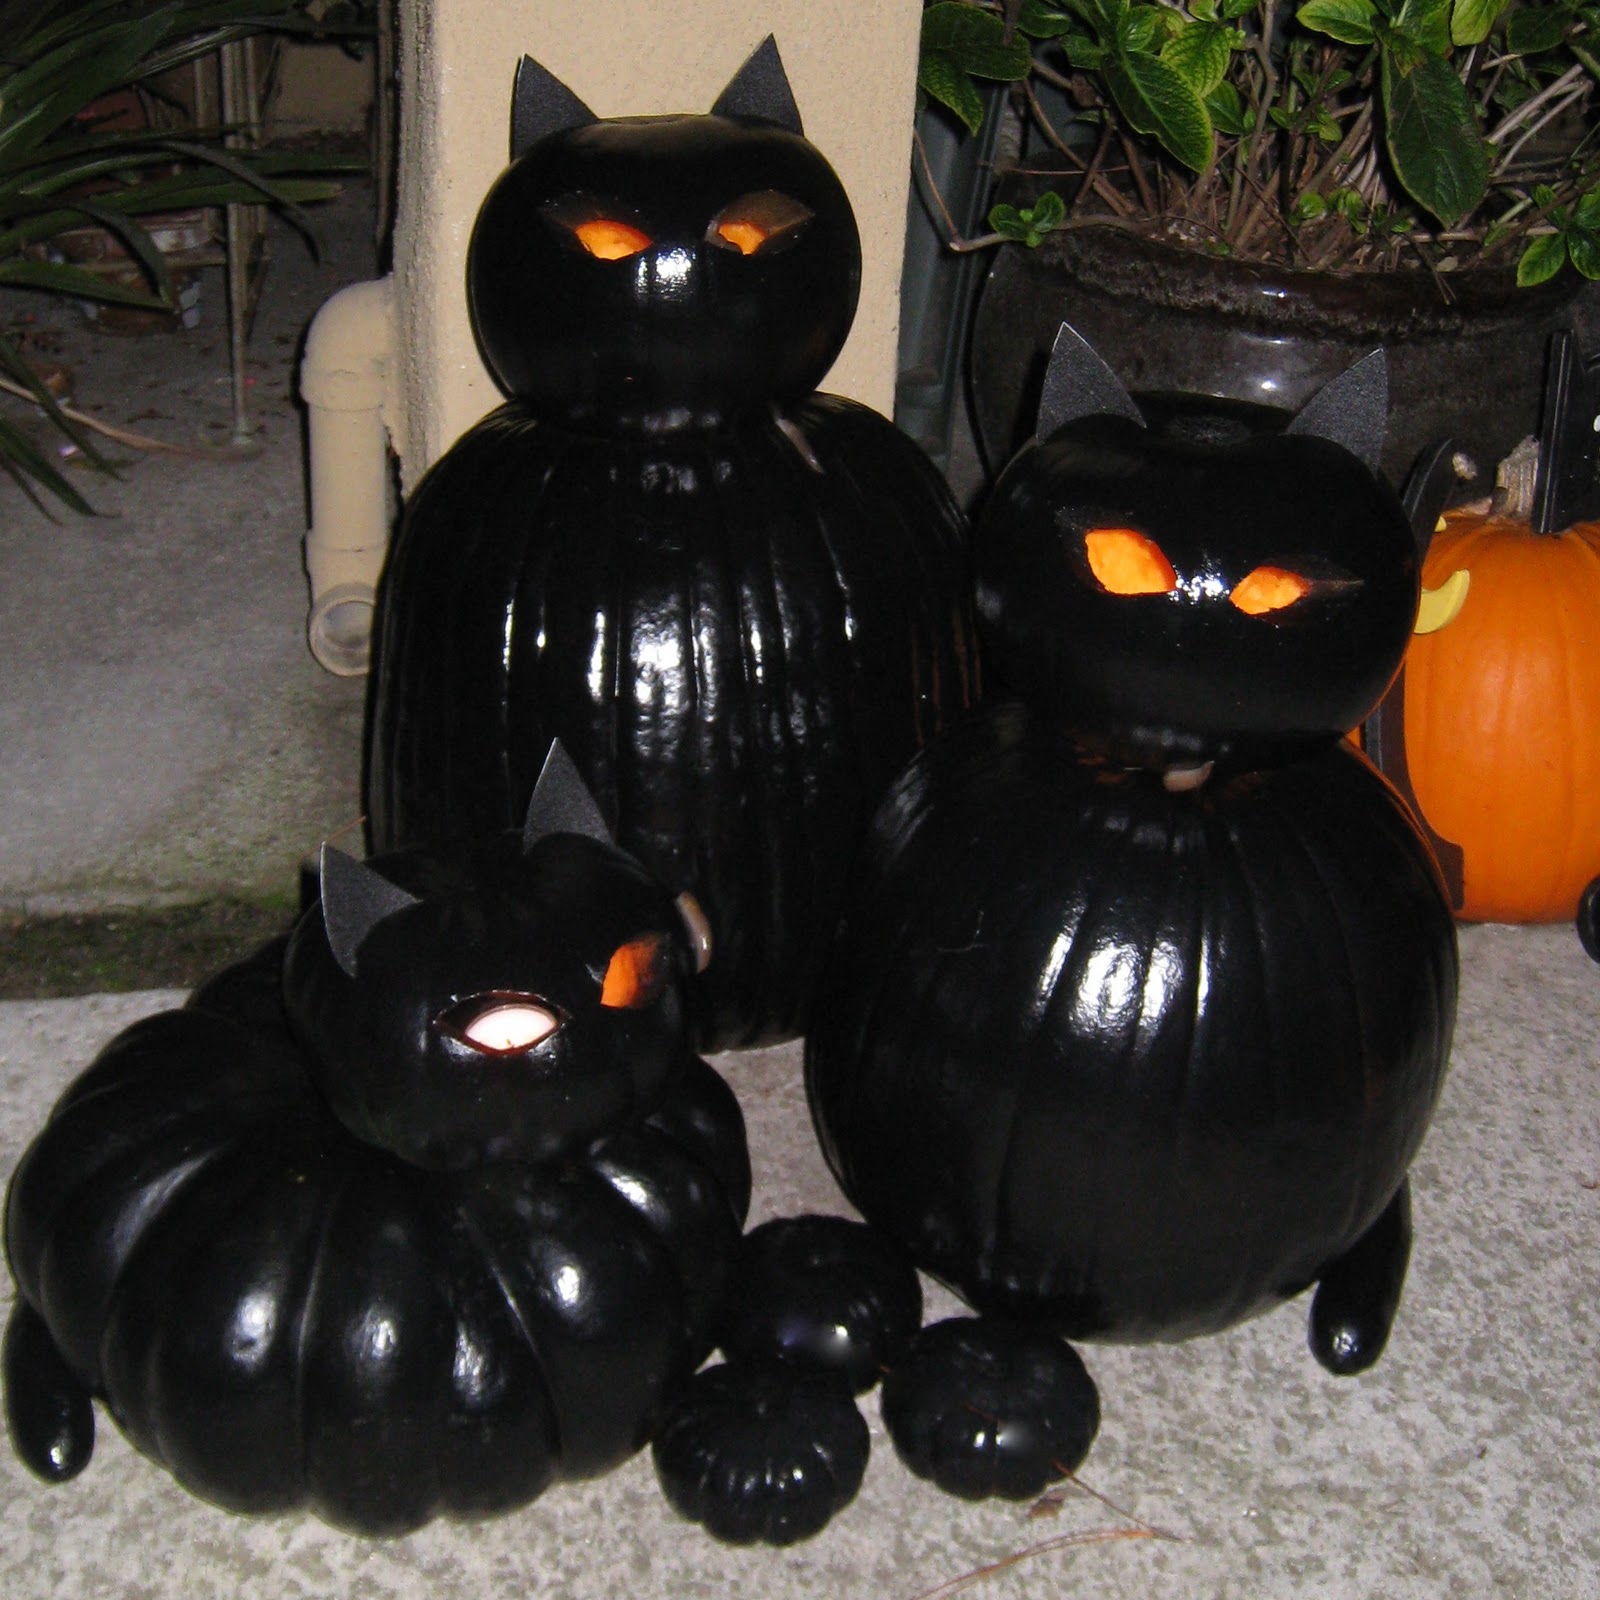
I'd been wanting to make these black cat o'lanterns for oh, about 4 or 5 years since I first saw them in Sunset magazine.  I'd been hanging onto the article that I tore out of it ever since.  But what happens every year is that I either run out of time or I don't have all of the supplies by the time Halloween rolls around.  But last year, my creative bones started to grow back, so I decided that year was the year that I was going to make them! 


Here's how I did it. 

Materials:
    Knife or carving kit
    Pumpkins
    Pen
    Scissors
    Stiff felt or paper for ears
    Newspaper
    Curved cucumber, zucchinni or skinny gourd for tail
    Mini pumpkins for paws
    Black floral spray
    Wood floral picks (5 or 6 per pumpkin; optional)
    Mallet or hammer for attaching picks to base pumpkin (optional)
    Tea-light candle in flat dish or jar lid

Step 1: Gather some pumpkins.    


Cats come in all shapes and sizes; so do pumpkins, thank goodness, so pick out a few.  Tall, skinny, squat, fat.  I chose some regular pumpkins and some short sugar pumpkins (i.e. Cinderella pumpkins).

Have I mentioned my pumpkin obsession?

Step 2:  Then choose larger and smaller pumpkins for the body and head shapes.  I used zucchinni for the tails, and those tiny pumpkins for the paws. 


Step 3:  Now it's time to gut those pumpkin heads.  No need to hollow out the large body pumpkin; the candle sits inside the head.  And don't you dare throw out those seeds!    


Step 4: Take the "head" pumpkins, flip them over and carve out some curved slits for the ears. The underside of the head pumpkins will be the top of the cat's head.


Step 5: Cut out the ears from stiff felt.  You can find sheets of felt at the craft store.


Step 6: Print out the eye templates (see step 2 in link above), tape to pumpkins and poke along the lines for cutting guidelines. 


Step 7: Spread out some newspaper, and stuff some of it into the heads to keep the spray paint from getting inside, so that the eyes will glow orange when lit! 


Step 8: Using floral spray paint, spray your veggies! 


Step 8: Once dry, rearrange the pumpkins to look like cats.  Add the ears.

Yes, they are sharing a paw.  They are Siamese, you know.

Step 9: Once it's dark, light them up!  


Step 10: Then turn out all the lights!  

Here kitty, kitty! 
Step 11: Enjoy the awesome comments from, friends, family, neighbors and tricker-treaters alike. 

I would love to hear about your best pumpkin carving adventures!  Please include links in your comments if you have them.   

Thursday, October 27, 2011

Little Astronauts

Two of the astronaut helmets I recently sold from my Etsy shop (Luminous Moon) showed up in Haute Mama's blog posting yesterday! 

http://hautemamadaily.blogspot.com/2011/10/blast-off-to-halloween-diy-bonanza.html

I just love seeing kids having so much fun in the helmets I make!  It always brings a HUGE smile to my face! 

Haute Mama made her own jetpacks for her sons and did an amazing job, too!!  I love the copious amounts of flames blasting out!  They are not only going to make it to the moon, but probably to Jupiter and back!  And did you see the astro-leisure suit she just threw together for her older son?!  Hilarious! 

Thank you, Haute Mama!  This TOTALLY made my day!!


Tuesday, October 25, 2011

Peek of the Week

I'm beside myself with excitement! Jessa received one of my space helmets as a gift for her son, and blogged about it, in her "Peek of the Week" posting!  Her peek of the week was a sneak peek of her children's Halloween costumes and her son's new astronaut helmet, from my Etsy shop!  Her other two kids are pretty cute, too, all dressed up for Halloween! I love the story about her younger son's Very Hungry Caterpillar costume. Sometimes money is no object when it comes to our children's happiness, and our sanity. 
What's Peek of the Week, you ask? It's Jessa's (from Happily Home Sewn) Friday feature and it's all about you!  She wants to hear (and share with her readers) what wowed week to week. It could be a cool finished project, a work in progress, a personal accomplishment, a cute kid moment, or something that surprised you.  Whatever happened that made you proud, laugh, smile, inspired, excited, or just plain happy - now that's worth sharing. 
So, if you have a blog, hop on over and link up!  Even if you don't have a blog, check it out!
http://happilyhomesewn.blogspot.com/2011/10/peek-of-week-october-21-2011.html
This blog post totally made my day!  Thanks again, Jessa!


My First Nordstrom Event, with Rags to Stitches

A couple of weeks ago, my friend Alissa, from Rags to Stitches, invited me to a fashion event at Nordstroms. Called Personalize Your Style, this event was made for me. A personal stylist?  Who will show me what's out there in this scary fashion world?  Who will show me what might actually look good on me?  AND help me stay with in my budget?  Plus, CHILD CARE?   I'm pretty sure a mom set this thing up.  Can you say, "ALISSA" from Rags to Stitches?  That's who set this up.  Thanks, Alissa!

This was perfect timing, because without even looking, I was pretty sure I didn't have anything to wear to Blog Sugar the next weekend. Everything I have is either old, ratty and out of style or too small. Anyone looking in my closest would pretty much come to the conclusion that I am no fashionista.  So, I was really looking forward to this opportunity to be a tiny bit more fashion-forward. 

The event was being held at Nordstrom, Fashion Island, and Stevie, was our stylist that day.  She had a rack of amazing selections to show us.  Including accessories.  And I loved how everything mixed and matched. 


I'm a plain Jane kind of a girl, so I wasn't looking for anything too flashy.  Can you tell?  Look at the color pallet of my selections:


I finally decided on this color block shirt, which was cut just right and I love the colors.  So excited to wear it at Blog Sugar!  Here's a sneak peak:


And what's a trip to Fashion Island, without a pit-stop at Sprinkles Cupcakes.  They were giving away cupcakes that day.  Couldn't miss out on that! 


Thanks again for including me, Alissa!  I'm looking forward to the next one!

Related Posts Plugin for WordPress, Blogger...